Passionate green fingers or not, everybody does, at one point or another, fancy themselves as a home gardener. With all the up-cycling and DIY ideas doing the rounds, how can gardening be left out? So, there’s this latest and very fetching, trend of creating miniature garden tableaus and fairy gardens which is adding onto the macro trend of urban gardening, as well. Now, space and soil are not going to be the constraint as balconies, terraces, window sills and even, the entryway, are all potential space where all the planting and pottering can be cultivated. And, where do you start at? We recommend you figure out a yet-unbooked weekend and round up all the broken pots and planters to begin the play with.
Once armed with your broken earthen planters, you need to gather the shards of the planter, some earth and moss, plants [ideally smaller varieties like bonsais, flowering saplings, herbs or succulents], and pretty little odds and ends [let your imagination run wild as you design your favourite themed fairy garden and go simple or elaborate depending on the time you have].
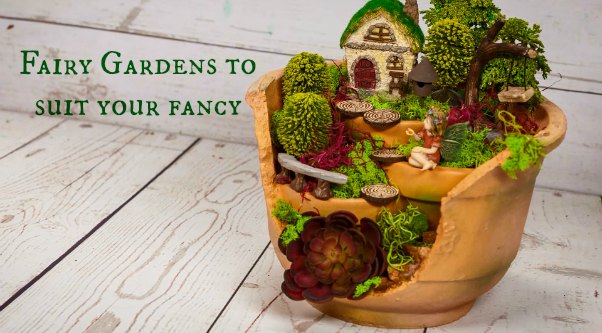
The steps to an easy DIY fairy garden constructed in a broken planter [pic courtesy – Distractify.com]
Now, the first step is to fill the base of the planter with soil, then place the largest shard as a wall in the middle of it, facing outward, and covering somewhat the gap in the broken area of the planter.
Go on to pack in more soil around the shard to hold it in, until the pot is half full and then stick in the other large shard into the soil, diagonally. Pack in more soil to hold it in place, until the pot is 3/4 full. Place the smaller shards in an ascending order so that the arrangement resembles that of a stair.
Next, place some moss between the gaps of the stairs and fix in the plants in your desired spots, firmly rooting them in along the edges of the pot shards and up the soil. Right on top of the arrangement can come in the most special plant you have bought or the prettiest decoration. Use a spray bottle to water the garden and voila, you are done.
Also, to remember, that symmetry is not of essence here as you are mainly looking at creating a beautiful collage, as it were. Once done with the plants and the moss, you come to the fun part of the game as you set about decorating your fairy garden with bric-brac like miniature houses, fairy figurines, cages, birds and all that catches your fancy and suits the theme. And while at it, look through the house for items you are thinking of discarding or those just lying there – seashells, aquarium pebbles, buttons and marbles, bottle caps, ice cream sticks to create signposts or to make a footbridge, or even a broken teacup to sit on top of the garden – and plug them into your miniature garden tableau to make it come alive.
A gnome-house fairy garden with toy figures, house and other intriguing details by Joann.com
While the above is an easy guide to building your own fairy garden with a broken planter, for those not having a broken plant-pot to up-cycle can actually start with a new terracotta one which has been soaked in water overnight and then broken into with a drill to resemble a cracked planter. And while at it, you might want to keep a note of the following tips and tricks that come in handy.
Choose the right planter – look at the space where you are thinking of locating this fairy garden and then choose the planter accordingly as the size ratio is very important so that it does not look out of place. While you can reuse a broken pot or break into a new one, you can even look at other interesting options like an old ceramic teacup, or soup bowl to make a miniature fairy garden for your table top.

Create your own garden of little stories in these miniature wonderlands-in-a-planter
Choose the fairy garden theme – decide on which of your visions you are going to realise with this miniature garden. Is it going to be a log cabin using a tree stump in the middle of the arrangement, or a birdhouse perched on top, or a beach themed one with sea shells and blue beads strewn around, or a gnome’s house with fairy figurines resting beside the plants. You are boss here!
With bonsai ferns and succulents, here’s a miniature garden in a planter placed interestingly
Chart it out on paper – before getting on with the actual gardening, it’s a good idea to draw out the scheme and see if you have the requisite materials for the design, or to even check at the end of the process if you have missed out on putting in any element
Check the spot – knowing that where you plant it is going to impact it all, figure out if your desired spot will have a full sun all day, or will it be a bit damp and shaded? A semi-sunny spot is the best and look for one in your balcony, or terrace, and it can even be under a large and thriving tree in your lawn.


